Search This Blog

Monday, December 15, 2014

Linux swappiness parameter

The swappiness parameter controls the tendency of the kernel to move processes out of physical memory and onto the swap disk. Because disks are much slower than RAM, this can lead to slower response times for system and applications if processes are too aggressively moved out of memory.
  • swappiness can have a value of between 0 and 100
  • swappiness=0 tells the kernel to avoid swapping processes out of physical memory for as long as possible
  • swappiness=100 tells the kernel to aggressively swap processes out of physical memory and move them to swap cache
The default setting in RedHat is swappiness=60. Reducing the default value of swappiness will probably improve overall performance. A value of swappiness=10 is recommended, but feel free to experiment.
To check the current swappiness value:
cat /proc/sys/vm/swappiness
To change the swappiness value A temporary change (lost on reboot) with a swappiness value of 10 can be made with
sysctl vm.swappiness=10
To make a change permanent, edit the configuration file /etc/sysctl.conf with your favorite editor. Search for vm.swappiness and change its value as desired. If vm.swappiness does not exist, add it to the end of the file like so:
vm.swappiness=10
Save the file and run the this command to apply your change:
sysctl -p
you can also clear your swap by running swapoff -a and then vm.swapon -a as root instead of rebooting to achieve the same effect.

Tuesday, December 9, 2014

Audit Trail Purging (11g Release 2 Only)

As you know Oracle Audit write log to AUD$, FGA_LOG$ tables and OS files, XML files. Day by day these tables and directorys grow in large size. In pre 11g Release 2 you must manual delete or truncate tables and delete OS files, XML files periodically.
In 11g Release 2 you have 1 build-in package to do this easily.
First you must initialize purge process:
begin
    sys.dbms_audit_mgmt.init_cleanup(
        audit_trail_type     => sys.dbms_audit_mgmt.audit_trail_all,
        default_cleanup_interval    => 30*24
    );
end;
You can see your purge process by below query:
select * from DBA_AUDIT_MGMT_CLEANUP_JOBS

Next, to perform the actual purge:
begin
  dbms_audit_mgmt.clean_audit_trail(
    audit_trail_type =>  dbms_audit_mgmt.audit_trail_all
  );
end;

When the initial purge is complete, you may want to set up an automated process to execute this periodically. You will need to create a DBMS Scheduler Job as shown below:
begin
  dbms_audit_mgmt.create_purge_job (
    audit_trail_type    => dbms_audit_mgmt.audit_trail_all,
    audit_trail_purge_interval  => 7*24,
    audit_trail_purge_name => 'all_audit_trails_job'
  );
end;

Since the above SQL performs a DELETE operation, it is not very conducive to a large delete operation. You may want to break it into chunks:
For Database Audit trails
begin
 dbms_audit_mgmt.set_audit_trail_property(
  audit_trail_type           => dbms_audit_mgmt.audit_trail_aud_std,
  audit_trail_property       => dbms_audit_mgmt.db_delete_batch_size,
  audit_trail_property_value => 100000);
end;

For FGA
begin
 dbms_audit_mgmt.set_audit_trail_property(
  audit_trail_type           => dbms_audit_mgmt.audit_trail_fga_std,
  audit_trail_property       => dbms_audit_mgmt.db_delete_batch_size,
  audit_trail_property_value => 100000);
end;

You can recheck your config:
select * from dba_audit_mgmt_config_params;

Then using a special package you will move the AUD$ table to the new tablespace:
begin
  dbms_audit_mgmt.set_audit_trail_location(
    audit_trail_type            => dbms_audit_mgmt.audit_trail_aud_std,
    audit_trail_location_value  => 'AUDIT_TS'
  );
end;

To move the FGA_LOG$ table to this tablespace:
begin
  dbms_audit_mgmt.set_audit_trail_location(
    audit_trail_type  => dbms_audit_mgmt.audit_trail_fga_std,
    audit_trail_location_value  => 'AUDIT_TS'
  );
end;

List of values for audit_trail_type parameter:
Parameter
Purpose: to remove:
dbms_audit_mgmt.audit_trail_aud_std
The normal AUD$ audit train the database
dbms_audit_mgmt.audit_trail_fga_std
The FGA_LOG$ table, for Fine Grained Auditing
dbms_audit_mgmt.audit_trail_db_std
Both normal and FGA audit trails
dbms_audit_mgmt.audit_trail_os
The OS file audit trails
dbms_audit_mgmt.audit_trail_xml
The XML audit trail files
dbms_audit_mgmt.audit_trail_files
Both the OS and XML audit trails
dbms_audit_mgmt.audit_trail_all
All of the above


Saturday, December 6, 2014

Installation Oracle Database 11g R2 using ASM on Oracle Linux 6 x64

This post I illustrate the installation Oracle Database 11.2.0.3 using ASM. So first of all you must have Oracle Grid Infrastructure 11.2.0.3 installed on Oracle Linux 6-x64. You can take this link to have how to do that. I use VirtualBox for all my posts.

Download Oracle Database software 11.2.0.3 from oracle support. You need download 2 file: p10404530_112030_Linux-x86-64_1of7.zip and p10404530_112030_Linux-x86-64_2of7.zip.

Using root, copy two Orale Database software download files to /soft directory on Linux server using WinSCP. Typing unzip filename command to extract these files. After running unzip command you will have directory /soft/database.

SSH login as oracle user and start vncserver. You notice the desktop number that vncserver has started in.
On your windown laptop, you open the VNCviewer and login as oracle user at the desktop number of the vncserver.
 
Open a terminal, change current working directory to /soft/database and execute command ./runInstaller to start the Oracle Installer:

Login as root user and execute the script :
 continue ...

To now, you have installed oracle database software. Then you must use dbca to create database:


Wednesday, December 3, 2014

Install Oracle Grid Infrastructure 11gR2 on Oracle Linux 6 x64 using VirtualBox

The installation is not a big problem with the DBA. But if you are a newbie, you need a Oracle Database for studying. That will take much time. Such that Oracle Grid Infrastructure is what you should start your way from.
Today I will install Oracle Grid Infrastructure step by step. The purpose of this intend for beginner save time in setting up study environment.
Let's begin ...

First of all you must have a Linux host. In this post I use Oracle Linux 6 on VirtualBox. You can take this link to have your Linux server.
Then you should configure the network for your linux host. This made your linux host can remote from client(your laptop). You can take this link.

Config public yum repository to install require packages from internet. You can take link http://public-yum.oracle.com lookup "Oracle Linux 6" section. And executing commands as the guide:
# cd /etc/yum.repos.d
# wget http://public-yum.oracle.com/public-yum-ol6.repo

Edit /etc/hosts file: enter the following command to edit /etc/hosts file. (Press "i" to switch to edit mode. Press ESC to switch to command mode).
# vi /etc/hosts

Configure hostname "oratrain.mylab.com" for your linux server:
# vi /etc/sysconfig/network

Install prerequirement:
# yum -y install oracle-rdbms-server-11gR2-preinstall

Install Oracle ASMLib: You can install by the following links:
In this post I install ASMLib as below:
# yum -y install oracleasm-support kmod-oracleasm 
# wget http://download.oracle.com/otn_software/asmlib/oracleasmlib-2.0.4-1.el6.x86_64.rpm
# rpm -ivh oracleasmlib-2.0.4-1.el6.x86_64.rpm

Configure Oracle ASMLib:
In this post I perform configuration as below:
# /etc/init.d/oracleasm configure

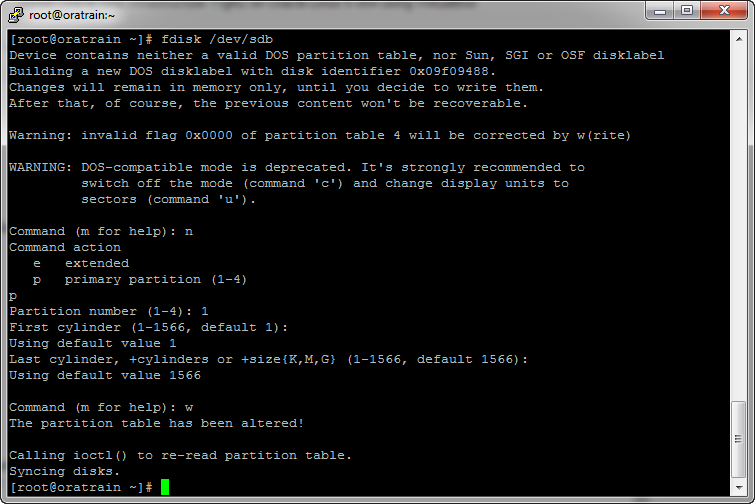
Shutdown linux server and add three hard disks with 10G in size. They are used to create asmdisks.

Restart your linux server and login as root user using putty. Three hard disks that you have just added have name: /dev/sdb, /dev/sdc and /dev/sdd. You should made parttion and format them. The below I only perform on /dev/sdb. You can do the same on /dev/sdc and /dev/sdd.

Now we create asmdisks from three HDDs

Amend the "/etc/security/limits.d/90-nproc.conf" file as described below. See MOS Note [ID 1487773.1]:
# Change this
*          soft    nproc    1024

# To this

* - nproc 16384

Set secure Linux to permissive
# setenforce 0

Stop firewall:
# service iptables stop
# chkconfig iptables off

Create the directories in which the Oracle software will be installed and change the oracle's password:
# mkdir -p /u01/app/oracle/product/11.2.0/db_1
# chown -R oracle:oinstall /u01
# chmod -R 775 /u01
# mkdir /soft
# passwd oracle

Download Oracle Grid Infrastructure from Oracle Support. You must download Oracle Grid Infrastructure 11.1.2.0.3+ to setup on Oracle Linux 6. Copy download file from Windows to /soft directory on Linux server using winscp(root user). Using unzip filename command to extract the download file.

In fact, you is not often in front of server. You must remote to it for all of your tasks. So I will use vncserver to remote desktop to Linux server and install Oracle Infrastructure. First install vncserver packages:
# yum -y install tigervnc-server.x86_64

Start vncserver: login oracle user on putty and type the command vncserver. Enter the password for the vncserver login when you are prompted password:

Using vncview to remote desktop into your linux as oracle user:

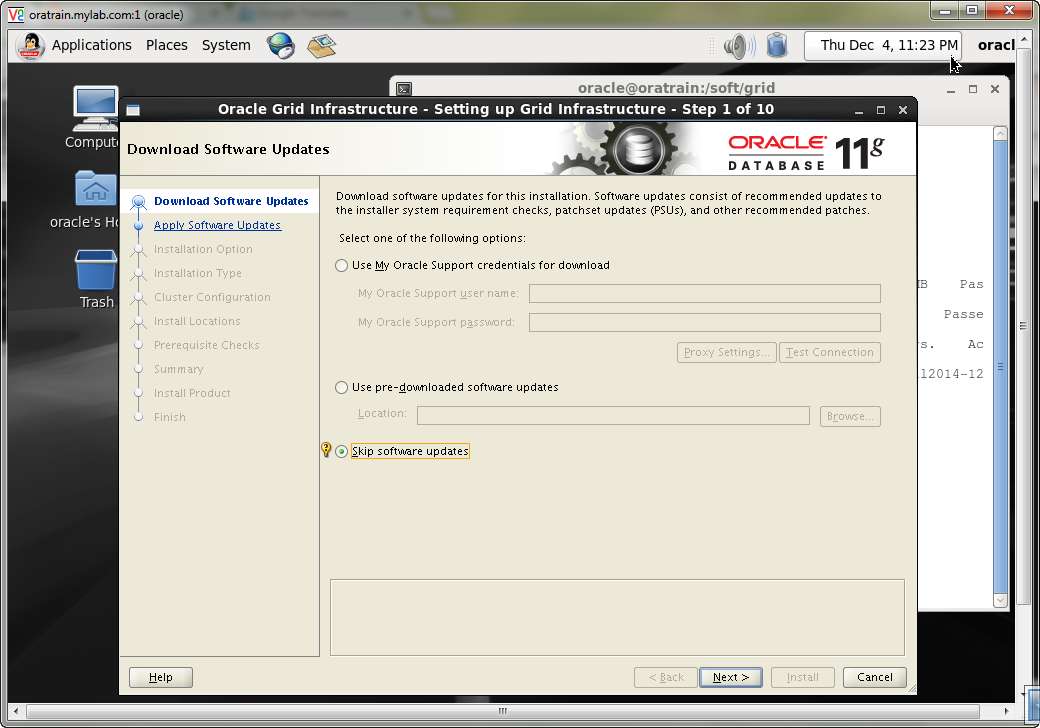
Now the installation is really started

You must execute two scripts by root. So open a new putty ssh connection to your linux as root and execute these scripts. Then continue ...

OK, the installation finish successful. 

You should add a new asm diskgroup for other usage: